Certain URLs and other references may not be working.]
Last revised: 04/21/2017, minor changes: 3/16/2019
This project was the subject of the article: Martin Ewing, AA6E, "A Software-Based Remote Receiver Solution, QEX, January/February 2014, pp 3-6. The code distribution for this article is at rrx code.
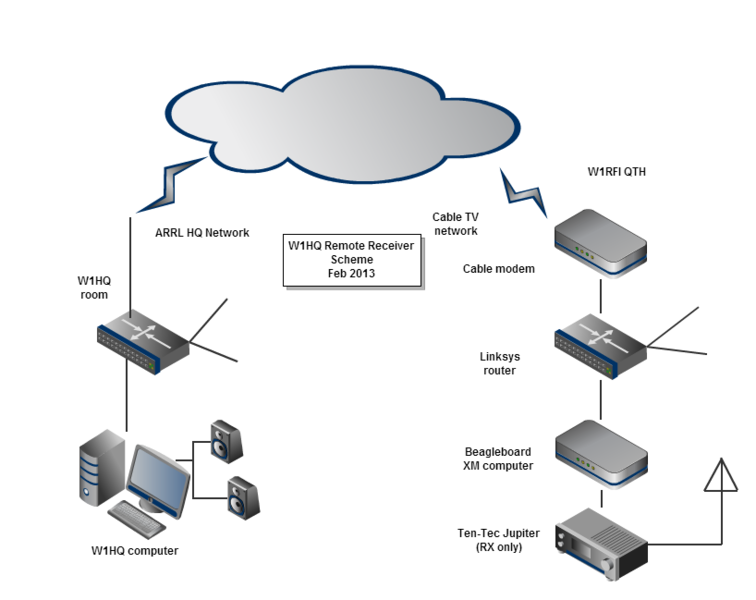
Outline of Setup
The RRX system consists of a receiver operating at our remote site and software running in W1HQ's main PC. There is a continuous Internet connection between them.
Remote Site
The remote site has a receiver (currently a Ten-Tec Jupiter) connected to an antenna system covering Amateur HF bands. The receiver sends its audio to a small on-site computer (based on a Beagleboard XM running Ubuntu Linux). The computer also controls the receiver via its CAT interface. The computer is connected to the Internet via a cable modem system. (The remote computer's IP address should not be publicly announced, but it will be available at W1HQ. Most users will not need to know it.)
Normally, the remote computer and receiver will be left running and should not require any user intervention. They should come back automatically following a power outage, assuming the Cable Internet service is OK. System maintainers can access the remote computer via SSH (AKA Putty) from HQ.
Local Site - W1HQ

The remote receiver software is installed on the Windows XP computer associated with the "big HF" operating position at W1HQ. (North east corner of the room.)
Using the Remote RX System
- Be sure the computer is on and you have a live audio output connection. Audio is provided at the computer's headphone jack. You can use amplified speakers or your favorite headphones, but something has to be connected! You may wish to set the Windows audio level control to mid-range.
- You will find a Desktop icon labelled "Remote RX" (or similar). Double-clicking here will launch the user interface for the remote system. (This is a Python application.) You may need to organize the computer desktop if you need logging or other software to run alongside the remote receiver panel.
- The Remote RX software will probably display a small window ("wxPython: stdout/stderr") where some status and error messages may show up. In case of trouble, make a record of what you see in this window for trouble-shooting.
- The main window is similar to a radio's front panel. On the top level, you will see an S-meter and VFO Frequency indicator. At the top right are "activity" indicators. The "control" light flashes according as there is control activity with the remote radio, once a second or so. The "audio" light will come on when the audio link is active.
Below the top row, you will notice various "radio buttons" that let you select, bands, modes, bilter settings, AGC, NB, attenuator, auto notch, and noise reduction. (These are the Jupiter's controls -- some of them are more effective than others!) Only 3 bandwidth settings are provided at this time, even though Jupiter's DSP allows fine adjustments.
You will see the rotary controls for RF and AF gain. These work like real knobs. You click near the control "dimple" and drag it clockwise or counter-clockwise. Default RF gain is 100%. Default AF is 35%, which may be a little "hot" for the Jupiter.
Buttons for audio link "start" and "stop" are provided. Normally, you will start the link and leave it running until you are finished with the program and terminate with the "quit" button.
The bottom line of the control panel has a status indicator, which can be "Normal" or "Muted". You can mute the audio output (while the link is still active) by hitting any keyboard key. (Actually, the window has to have the "keyboard focus" -- meaning that you have to have clicked on a control to make sure that your keyboard action is received properly.) Muting this way is convenient for Transmit / Receive switching. It is faster than stopping and starting the audio link. - When the system starts, it will try to connect to the remote receiver for CAT control, but the audio will not be switched on. The control activity light will begin to flash regularly after a few seconds. This indicates a successful connection.
- Operating the VFO. The VFO display indicates the receiver tuning in Hertz. The range is limited according to your band selection. You can adjust frequency in several ways. Most simply, you can click on the "+" or "-" buttons above and below each digit, respectively. That will increment or decrement by 1 unit. After you have clicked on a "+" or "-", you may notice that the button is slightly highlighted. (That indicates "VFO has focus".) When this is the case, you will find that you can use your mouse wheel to tune the radio just by pointing at a digit and rotating the wheel "up" or "down". (The digit response will be slow because it has to wait for a command to be sent to the remote receiver.)
- There is one further way to change the VFO. Click on the "Freq. from Keyboard" button to the right of the VFO. A new dialog window will come up where you can enter any frequency in MHz within the current band limits. For example, "14.250000" or "14.25" if you are in the 20M band. (If you want to jump to a random frequency outside the current band, use the Bands setting "max".) When you have entered your frequency, click "OK".
- Select band, mode, and frequency. You might set the audio gain to a comfortable level, maybe 20%. Then start the audio link. The audio activity light should come on steadily and you should hear some audio.
Installation & Maintenance
This is technical reference information for RRX system maintainers. Users, proceed at own risk! 2/4/2013 – mse
Remote Site Installation
This assumes that the Beagleboard XM system has been loaded with Ubuntu OS and all required software. It will need to be installed at the remote site with the Jupiter transceiver.
Home Router Preparation
- Acquire home router / modem password, if required. E.g., for Linksys router or U-Verse Residential Gateway. This will enable changes to the local network configuration.
- Log in to router/gateway via local web browser, typically at IP = 192.168.1.1.
- Look for "Network Address Server Settings (DHCP)" or similar. This will normally be enabled for the home network. Notice the "starting IP address". It might be 192.168.1.100. Notice the "maximum number of DHCP Users". It might be 50. This would mean that the block of addresses from 192.168.1.100 - 192.168.1.149 is available to be assigned dynamically for various home computers. (I.e., the same computer might get a different address in this block each time it boots.)
- For RRX use, we need a static, unchanging, local IP address. We need to assign one from the overall home network address block, typically 192.168.1.1 to 192.168.1.255. However, we have to avoid conflicts with special low or high addresses, like the home router itself. Pick one. In this example, 192.168.1.10 might be a good choice. The IP chosen must not be in the dynamic DHCP range. Make a note of the chosen IP address and tape it to the RRX Beagleboard box.
- The router is normally functioning as a firewall, preventing undesired incoming traffic. For RRX, we have to open three IP "ports" and direct incoming traffic to the RRX Beagleboard IP address assigned above. With your local web browser viewing the router configuration pages, look for the section on "Security" or "Firewall". There should be a section on "Port Forwarding" or similar. A Linksys router might have a panel for "Port Range Forwarding". We need three entries:
- Application: "ssh"; Start: "22"; End: "22"; Protocol: TCP; IP address: <as chosen above>; Enable: yes
- Application: "rigctld"; Start: "4532"; End: "4532"; Protocol: TCP; IP address: <as chosen above>; Enable: yes
- Application: "afrecv"; Start: "14694"; End: "14694"; Protocol: UDP; IP address: <as chosen above>; Enable: yes
- When all these are entered, click "Save Settings". Other routers will have similar procedures for setting up port forwarding.
Jupiter & Beagleboard Computer Installation
- (Acquire appropriate username and password for the remote unit.)
- Provide dry, preferably cool, indoor space for receiver & control system
- AC power (Consider UPS backup or surge protection)
- Important: Power up Jupiter and, using menu controls, ensure that the transmitter is disabled.
- Antenna (broadband HF, non-directional)
- Home router: CAT-5 / CAT-6 connection to RRX. (Remote link uses ~3 kB/s when Speex compression is selected.)
- Configure the RRX IP address to the number selected above. It will be easiest to set this up at HQ Lab, before the unit goes out into the field. Otherwise, you will have to connect to the Beagleboard's serial port using your own computer, log in to the Beagleboard, and give the correct Linux commands to install the correct address. (You will need further instructions.)
- When the board IP is configured and connected to the home Internet, an outside user should be able to log in via SSH to confirm proper setup.
- Set up & verify DDNS service from controller (via ddclient) to set the proper DNS entry for (check for current address). Verify operation by rebooting cable modem (which may change IP)
Local (client) Installation
This section focuses on the software installation on the W1HQ Windows PC. This system does not fully support multiple client systems. It is designed only to work with one remote server and one local client installation. (It is possible to operate multiple clients, but users must coordinate in a friendly way to prevent conflicts.)
The client installation is somewhat complicated because of the various software packages that have to be downloaded to make RRX client work in a Windows environment. (Linux installation is relatively simple.)
- W1HQ Station Computer
- Starting with “vanilla” Windows XP SP3 (ARRL IT config., security patches up to date!)
- Create “remoterx” directory as C:\Documents and Settings\w1hq\remoterx
- Download & Install following software
- DirectX June, 2010 end-user runtime (49 MB) e.g., Version: 9.29.1974; Date published: 4/18/2011; http://www.microsoft.com/en-us/download/details.aspx?id=8109
- Visual Studio 2010 C++ redistributable (SP1) (5 MB?); http://www.microsoft.com/en-us/download/details.aspx?id=5555
- Python 2.7 (latest version, 32 bit ASCII windows) from python.org Best to add C:\Python27 to system PATH environment variable; http://python.org/download/
- wxPython 2.8 (latest version for Python 2.7 32 bit) e.g. wxPython2.8-win32-ansi-py27; http://wxpython.org/download.php#stable
- Putty & Plink (SSH desktop & command-line clients) e.g. beta 0.62; http://www.chiark.greenend.org.uk/~sgtatham/putty/download.html
- Install plink.exe in remoterx directory. See important note below before using.
- (Optional) Install manually in new folder C:\Program Files\putty
- (Optional) Add C:\Program Files\putty to environment PATH variable
- (Optional) create desktop shortcut for putty
- Nircmdc.exe (Windows command utility - http://www.nirsoft.net/utils/nircmd.html). Place in remoterx directory.
- Obtain RRX Binary Client Software for Windows: http://aa6e.net/files/rrx_binary_client_distrib_2013_02_21.zip (150 kB).
- afrecv.exe (C++ sound receiver, production version – not debug). Place in remoterx\af directory
- Place files remote.py, Fspin.py, hamlibio.py, smeter.py, indicator-grn.png, and Signal_Meter_M0MTJ_1.png in remoterx directory.
- Create remote.bat file containing "python remote.py -r host.domain.org -u username -p password" or equivalent. (Obtain current login information from W1HQ.)
- Create desktop shortcut for remote.bat (or remoterx directory) as desired.
Important note on first use of plink.exe: Because plink uses a secure (SSH) connection, the remote host's key needs to be known to the client software before routine SSH-style connections can be made. The easiest way to do this (before trying remote.py) is to launch a Command Prompt window on the client, change directory (CD) to remoterx, and run plink manually one time. E.g.
- CD remoterx
- plink hostname
If the remote key is unknown, plink will come back with key information ending with the question "Store key in cache? (y/n)". Answer "y". Then plink asks for the username and/or password. You can terminate (CTRL-C) at this time. The key will have been stored, and the main program remote.py should operate correctly henceforth.
Technical Software Notes
These notes are provided for anyone who wants to dive a little deeper into the Remote RX (RRX) system, perhaps to extend or modify -- or even to find bugs.
The remote RRX hardware was designed for low cost and minimum on-site management. A Beagleboard XM computer board is integrated in an enclosure along with a power supply adequate for both the computer and the Jupiter. (Photos below.) The Beagleboard XM was chosen because of its power, flexibility, and moderate cost (approx. $150). It is fully open-source hardware with a large developer/user community. In normal operation, it is a "headless" system (no video interface), run entirely from the Ethernet connection. An alternate design might have used an inexpensive laptop computer, which would have had the advantage of a graphical interface for setup and debugging, but it would have had extra cost and would have been more trouble to package as a system.
RRX software runs on the remote Beagleboard XM computer. The Beagleboard is an inexpensive, highly flexible device based on an ARM v7, Cortex-A8 processor. (See http://www.beagleboard.org.) An full-scale Ubuntu Linux operating system supports a wide range of software, allowing many possible future applications. The RRX project uses the audio input interface, USB (for rig control), and Ethernet interfaces.
The RRX project is almost entirely based on open source software, excepting components related to Microsoft Windows. When running with a local Linux (client) computer, everything is open source, making it very easy for interested hams to modify and extend our work.
Our software is distributed under a General Public License (GPL) as free and open-source. Generally, you may use and modify the code for your own purposes. If you distribute new software using modified code, you must also make your source code available under a similar license. (That's a summary. Please read details in the code comments.)
Current Source Code (Download)
A preliminary release of the RRX software (source code with VS2010C++ project files) is available:
-
- Full Client/Server source: http://aa6e.net/files/rrx_distrib_2013_02_21.zip (17 MB)
The binary client software is appropriate for installation on a Windows client computer, after all prerequisite libraries (VS runtime, DirectX runtime, Putty/plink, nircmd, etc. have been loaded.
All code is distributed on an "as is" basis. We appreciate e-mail feedback (to aa6e /at/ arrl.net), but no user support is available.
Stats as of 2/2013: 2123 lines of Python, 1247 lines of C/C++ (all including comments).
System Architecture
There are five major applications and several software libraries involved in the RRX system, although the W1HQ user only works directly with one program (remote):
remote.py
The application that the W1HQ user sees is called remote.py, or simply remote. This is written in Python using the wxWidgets library (wxPython) for graphical interface. It is naturally cross-platform, running equally well on Windows and Linux systems.
The main chore for remote is to act as a remote control panel for the Jupiter receiver at the remote QTH. Much of the programming has to do with the implementation of classes for the VFO and the S-meter. Existing wxPython controls could be used for most other needs.
When remote starts up, it initializes its GUI, but it also sends commands to the remote Beagleboard to start the rigctld and afxmit servers (see below). It does this by sending remote commands using the secure SSH protocol. When running under Linux, remote uses subshells that execute a Linux SSH command. Under Windows, we use the (command-line) plinkprogram which is part of the Putty distribution, a popular Windows version of the SSH client. Using either SSH or plink, remote runs the ~/start_rig and ~/start_af scripts on the Beagleboard. (The servers are idle until they receive further commands from remote.)
After start-up, remote operates on a repeating 1-second timer interrupt. Using Hamlib/rigctld calls, the signal strength is read and the S-meter is updated. Then, if any control setting has changed, it is transmitted out to the rig. At a slower rate, control settings are transmitted continuously in case the Jupiter has gotten out of sync. To maximize throughput, there is no read-back of settings from the Jupiter. (Received audio normally lets the user hear if the settings are OK.)
The second job for remote is to control the audio channel. The user is offered "start" and "stop" buttons along with a keyboard-controlled "mute" function. (Recall that the remote afxmit server was started at remote's start-up time.) The Start button executes a subshell command in the OS (Linux or Windows) to launch afrecv, which then signals afxmit to start sending. Transmission starts and continues until afrecv is terminated by another subshell command initiated by the Stop or Quit buttons.
A user of remote will normally want a fast way to mute the computer's sound output. A keyboard press (e.g. the space bar) will cause remote to enter the mute condition, and a second keyboard press will toggle to unmuted. The Mute operation is faster than Start/Stop, especially under Windows.
An orderly shutdown of remote (using the Quit button or menu option, or the window close box) should signal "Stop" to afxmit and halt the audio stream. However, a disorderly shutdown may leave the audio stream running. Since afxmit is sending with UDP, it may never know that the receiver has disappeared. This is judged a tolerable risk, since the data rate is so modest -- about 3 kB/s when using Speex compression or 20 kB/s uncompressed.
Many infrequently modified parameters are set at the beginning of remote's Python source. This includes information about the "target" (the remote Beagleboard) -- its. IP address, port numbers, and SSH account information. (These should not be published!) USE_CODEC selects which codec is used for audio transmission. The present choices are "0" (raw) and "1" (narrowband Speex). Additional codecs (such as Opus) can be added if needed, but it seems that the possible gains from better compression methods are unlikely to justify much coding effort. Furthermore, we are not being pressed to minimize network bandwidth.
A number of parameters (MODES, BANDS, etc.) define the available controls and frequency ranges of the Ten-Tec Jupiter. These should be simple to edit if we need to change to a different remote receiver. TIMER_INTVL sets the interrupt cycle rate at 1,000 msec. This number can be reduced to provide faster cycle times -- up to some limit.
rigctld (Hamlib)
Background: Hamlib is an open-source project that implements a common Application Programming Interface (API) which can be used by other applications to control amateur radio equipment ("rigs"). A wide variety of rigs are supported. For programmers, using Hamlib offers a big advantage over custom rig-control programming, because one API covers many rigs. (The downside is that the API is aimed at a lowest common denominator "rig" -- usually providing a subset of the commands available on a given rig.) Hamlib is coded in C and was originally intended as a library to be linked with other code, such as C, C++, etc.
A recent Hamlib development is the application rigctld. rigctld "exposes" the Hamlib API (or most of it) to the Internet. I.e., it acts as a rig server that any other application (local or remote) may access through a TCP/IP connection. RRX runs rigctld on the remote Beagleboard XM computer and is started when remote is started up. It listens for commands on port 4532.
Through rigctld, the remote program (at W1HQ) controls the VFO setting, gain controls, and many other functions of the remote receiver. (The receiver is currently a Ten-Tec Jupiter with transmit disabled.)
afxmit
afxmit is a C-language command-line application for the Beagleboard XM that accepts 8 kHz 16 bit mono samples from the audio interface, using the Portaudio library. Care is necessary to ensure that the software operates continuously (synchronously) on the audio stream. This implies a level of multi-threading or interrupt-driven code. Portaudio offers this capability. afxmit operates as an audio server, communicating with the base (local) computer via UDP packets. It responds to a small command set (start, stop, codec, quit), listening on port 14694.
When started, afxmit sends a steady stream of UDP packets, either as raw 16 bit samples or as data compressed by Speex. Speex can compress our voice-like stream by a factor of 5 or more. Compressed signal quality can be traded off against bit rate and CPU time, as desired. See RRX software options. (Speex is now supplanted by Opus for new applications.)
Speex compression is judged fine for ham voice communications, and for CW also. It may be usable for digimodes like PSK31, but this needs testing.
UDP transmission, rather than TCP, is convenient for several reasons.
- UDP has minimum latency and minimum network bandwidth. Low latency, real-time audio using limited Internet bandwidth does not lend itself to error retries. TCP provides reliability through buffering, sending acknowledgements, and allowing for possible retries.
- UDP "unreliability" is not a great issue. If a packet is lost, a momentary audio dropout is the only consequence. This is usually no problem.
- UDP packets simplify the synchronization of sender and receiver. The audio clocks of the Beagleboard and the receiving computer will drift relative to each other, leading to occasional dropped or excess packets. These add complexity to a TCP solution, but are easily managed in a UDP scheme.
Advantages aside, UDP packet handling by the receiving OS is not completely transparent (to this author!). There is some amount of buffering. How this works in Linux or Windows requires deeper study, if we want to extract maximum performance. Fortunately, our current software just seems to work.
afrecv
afrecv is the (command-line) client program that runs with the afxmit server. It began as a C-language program using the Portaudio and Speex libraries and running on a Linux PC. It operates through a simple command line interface that directs afrecv to talk with afxmit and set up the desired codec parameters and initiate an audio stream which is delivered to the Linux audio system (typically based on PulseAudio) via synchronous Portaudio calls. See RRX software options.
In a second development phase, afrecv was ported to Windows (Windows XP and Windows 7 are tested). This allows us to consolidate all RRX operation on the existing W1HQ station computer, alongside other ham Windows software. While there is some Portaudio support for Windows, we made the judgement that it would be easier to work with a native Windows audio API. There are many APIs to choose from, but most of them are vastly more complex than needed for RRX. (They support advanced media applications.) In the Microsoft DirectX package, the XAudio2 subsystem provides an API that is fairly similar to Portaudio's capability. (It is aimed at gaming applications.) A minor downside is that XAudio2 is not provided in the basic Windows installation. The DirectX runtime has to be downloaded from Microsoft and installed.
The current version of afrecv is a C++ application that can be compiled under Windows (Visual Studio C++ Express with XAudio2) or under Linux (gcc - g++ with PortAudio).
The Speex library was compiled under Windows, even though we might have been able to use some available DLL or lib files.
Compiling from Source and/or Binary Libraries
Source compilation requires
- Speex libraries (binary or source for Linux, source for Windows); http://speex.org
- Compiling for Beagleboard XM:
- ./configure --enable-fixed-point
- Use CFLAGS="-Ofast -mfpu=neon -mcpu=cortex-a8 -fsingle-precision-constant"
- (Resulting CPU load ~ 24% using default speex settings)
- Compiling for Beagleboard XM:
- PortAudio (binary or source for Linux ARM and x86); http://www.portaudio.com
- DirectX System Development Kit (for Windows, June 2010); http://www.microsoft.com/en-us/download/details.aspx?id=6812
Source files (Linux, links to be provided)
- af.h
- afdump.c
- afrecv.c
- afxmit.c (compiled for Ubuntu ARM architecture)
- gccdump
- gccrecv
- gccxmit
Additional Library (or compile from source)
- Hamlib (rigctrld running on remote ARM, rigctl for testing on local PC); http://www.hamlib.org
Problems and areas for future work
- Network security should be improved. Rigctld traffic can be tunneled through SSH, but UDP audio traffic needs different treatment.
- Extensions to two-way transmit/receive operation, rotator control, etc.
RRX Field Equipment
Hardware
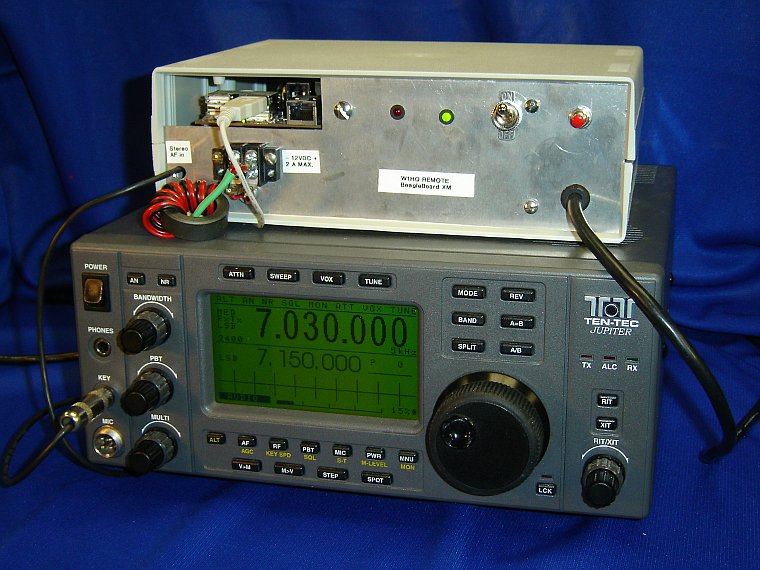
The Remote Receiver (RRX) Project field installation equipment comprises a custom computer and power supply box and a Ten-Tec Model 538 Jupiter] transceiver. (The transceiver's transmit mode is disabled.) The RRX box provides 12 V power (2 A max.) for the transceiver and accepts audio from the headphone jack. (Note misconnection in photo!)
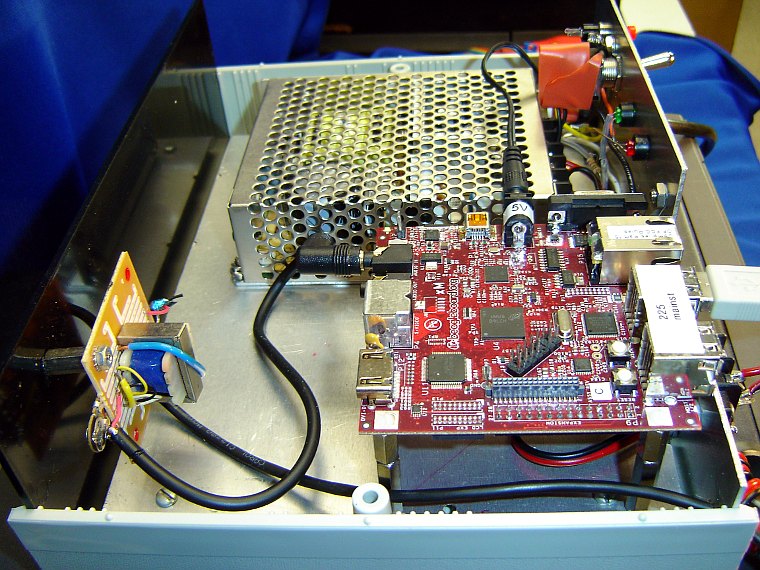
The setup for the RRX Project currently consists of a Beagleboard XM (BB XM) microcomputer with a dual output (12 V, 5V) switching power supply in a plastic housing. An audio isolation board (left) provides ground isolation and attenuation between the Ten-Tec Jupiter and the BB XM audio input. Note that the Jupiter's audio output is a bridging circuit, where the "ground" terminal must not be connected to true ground. Thus a transformer or other isolation device is necessary.
Internet connectivity is provided via the BB XM Ethernet jack, while CAT control of the Jupiter is provided with a USB-Serial adapter cable. (The BB XM serial jack is reserved for maintenance use.)
Software
The Beagleboard XM computer is loaded with Ubuntu Linux version 11.10 (or later). (Any ARM architecture Linux system can be made to work, but certain versions are well-supported for the BB XM. See http://elinux.org/BeagleBoardUbuntu for some useful methods of obtaining a working system. Only a "headless" system (command line only) is needed for this project, but it may be convenient to set up a full windowing system for testing. Later, the widow manager (gdm or equivalent) can be turned off to save memory and CPU.
(A GUI/window system would be convenient for the RRX field equipment, for easier configuration, monitoring, and troubleshooting, but this requires a video monitor, mouse, etc. Alternately, the BB XM would support a remote desktop solution that could be used with any PC.)
The BB XM operates well with an 8 GB micro SDRAM storage chip. (4 GB would probably suffice.)
Once an Ubuntu system is set up, any number of application packages can be downloaded from the Ubuntu repositories. The RRX system currently uses the following standard packages:
- gcc (C compiler and other development tools)
- ntpd (Network time synchronization)
- ddclient (Dynamic DNS synchronization, connecting with dyndns.org)
- sshd (server for SSH connections)
- ufw (firewall)
- hamlib
- portaudio
- speex (recompiled for integer arithmetic)
In addition, we need the custom C program afxmit and the startup script start_all.
File Manifest for Python/C++ local software
Folder .../remoterx/af/
- afrecv (Linux executable, compiled for i386 or amd64)
- afrecv.exe (Windows executable, 32 bit)
folder .../remoterx/
- readme.txt (optional)
- FSpin.py
- hamlibio.py
- indicator-grn.png
- Note.txt (optional)
- remlab.bat (optional)
- remlab.sh (optional)
- remote.bat (Windows)
- remote.py (main program, current version 0.27?)
- remote.sh (Linux, optional)
- Signal_Meter_M0MTJ_1.png
- smeter.py
- nircmdc.exe (Windows)
- w1hq_remote.doc (optional)